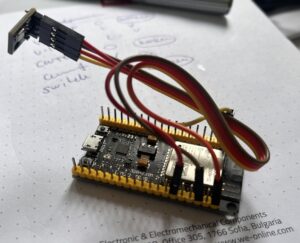
I had to “invent” my own remote thermostat because my daughter’s room was too chilly at night due to a poorly positioned convector heater. The heater’s integrated thermostat was working well, but inaccurate because it was mounted behind a curtain. My DIY remote thermostat monitors the temperature exactly where needed to ensure her comfort – next to her bed.

Components and Setup
I used what I had lying around at home, basically leftovers from other prototypes and stuff I had bought.
- ESP32 (MH ET LIVE ESP32DevKIT): Used as a main controller, developed with PlatformIO with Arduino, managing the thermostat’s main functions.
- BMP180 Sensor: Although not the most precise one for temperature (as it is more of a barometric pressure sensor), it provides relatively good values for the use case. The sensor is connected via I2C.
- Tapo P110 Plug: Controls the heater, turning it on when the temperature drops below a set threshold, and off when it rises above.
The firmware logic is as follows:
- The ESP32 connects to Wi-Fi (a hardcoded list of known networks)
- Receives a static IP from my router (which I preconfigured)
- Syncs time via NTP
- Check if it is nighttime (it is only active at night)
- Measure temperature every 30 seconds and control the Tapo Smart Plug
- In addition, there is a small webserver running that I can open on my phone to check temperature history and current temperature
- (Optional) Support for LiPo battery
Challenge: Tapo Smart Plug
One of the challenges I encountered was controlling the Tp-Link Tapo Smart Plug. Tapo uses a proprietary protocol, which hasn’t been made public. Fortunately, someone reverse-engineered the protocol, and there’s a Python implementation of the Tapo protocol, along with a REST wrapper of the Tapo protocol. However, this solution doesn’t run directly on the ESP32, which would have been ideal. Instead, I reused a small home web server to handle the plug’s communication. A direct port to the ESP32 would be nice, for now, using the web server is a functional workaround.
Lessons Learned
Prototyping with Arduino: Using Arduino made the initial setup fast and simple. It’s an excellent platform for rapid prototyping, and PlatformIO makes it quick to setup without the hassle of setting up complicated environments. Getting the basic control mechanism working—monitoring temperature and controlling the heater—was straightforward and took less than an hour.
Edge Case Handling: As with most projects, getting the “happy” / “green” path up and running was easy. The real challenge came with covering all the possible edge cases—what happens when the Wi-Fi drops out, or the heater doesn’t respond, or if the time sync fails?! Ensuring the system could handle failures gracefully took much more time and effort than setting up the core functionality. This involved managing retries, ensuring consistent operation across different scenarios, and preventing unnecessary heater toggling in boundary conditions.
Battery Charging and Power Modes: Integrating battery functionality, especially for a system designed to run long-term, adds quite some complexity. Handling low-power modes for the ESP32 (to conserve battery when not in use) was one of the trickier parts, especially balancing performance with energy savings. Decisions like – drop wifi connection and reconnecting if needed, or keep a connection alive without exchanging data are difficult without proper measurements. In addition, having a webserver available all the time and being energy efficient is quite difficult.
Next on the list is to find a proper case for it. Stay tuned.